


Time Lapse Video in DinoCapture 2.0 for Windows lets your Dino-Lite record video frames at set time intervals, creating a time lapse movie without the need for you to stitch all of the photos together. Once recording is stopped the camera will automatically compile the frames into a cohesive video clip that you can playback.
To record a time-lapse video:
- Click the time-lapse icon
 in the video preview OR press F7 on the keyboard.
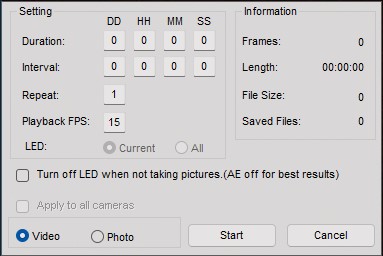
 - Under the “Setting” section, set the Duration of the recording, the Interval at which the camera will capture a frame, the number of times you would like it to Repeat, and the Playback FPS.
- Under the “Information” section, select Video to create a time-lapse video or Photo to automatically take pictures with the set parameters from Step 2.
- Click Start to begin recording.
- The Time-Lapse icon will blink red to indicate that the camera is capturing footage and the time displayed under the “Information” section reflects the time that has passed since you initiated the recording (elapsed time).
- Click Pause to pause the recording or Stop to stop the recording before the set duration.
Note:
- By default the Playback FPS is set to 15 FPS, meaning the camera needs to capture 15 frames so that it can stitch together one second of video footage.
For example:- If set to the 1 second interval option (one frame captured every second), you will need to record for at least 15 seconds to result in one second of Time Lapse Video footage (played back at 15 FPS).
- If the interval is set to 60 seconds (one frame capture every minute), the camera will need to be recording for at least 15 minutes in order to have one second of Time Lapse Video Footage.
- Allow the camera to record for a few more intervals than you think; this will give you the freedom if you opt to edit or trim the footage.
- You may notice that the video preview populated while recording is choppy. This is expected as the camera is working to capture time lapse footage and as such, will populate the previewed image in increments. Your final Time Lapse Video clip will playback at a smooth 15 FPS or other selected FPS.
Windows Settings
For longer time lapse videos, we recommend checking the computer “Power Options” settings on the computer. If the computer settings allow for sleep or disabling of USB, the computer may prevent proper capture of a Time Lapse. Change the settings to never go to sleep, as well as the USB settings to keep those on and active.
- Open the Start menu and type: Edit power plan
- Click on Change advanced power settings
- Navigate to Sleep, expand Sleep after, Select Never
- Navigate to USB settings, expand USB selective suspend setting, select Disabled
- Click Apply
- Click OK
