About DinoCapture 2.0
The DinoCapture 2.0 software from AnMo Electronics Corporation is a free software program that is compatible and included only with products manufactured by AnMo Electronics Corporation including Dino-Lite digital microscope cameras and Dino-Eye eyepiece cameras. Based on customer feedback, we have included many new features that give users a superior experience with a digital handheld microscope.
With the DinoCapture 2.0 software; you can add text, draw arrows, circles, and use other great drawing tools right on live video or on taken pictures and delete or edit the results if required. The DinoCapture 2.0 software also allows you to easily customize the drawing color and size giving you the proper look you want.
On certain models, the DinoCapture 2.0 offers a very powerful analysis tool which lets you measure on pictures as well as on live video. Measurements, as well as text, can be edited, reorganized, and deleted. The measurements can also be exported to Excel. For assured accuracy, you can also calibrate the measurements with some of our Dino-Lite models.
The interface is organized and easy to use allowing multiple user windows as well as the ability to use multiple Dino-Lite’s on one computer! The DinoCapture 2.0 software is a product created by AnMo Electronics Corporation in dedication to providing a high quality, competitively priced, and versatile digital microscopy experience for professionals and casual users alike.
Installation
Installing DinoCapture 2.0
We recommend downloading the latest version of the DinoCapture 2.0 software on our downloads page.
Once you’ve downloaded the latest version, run the installation software and follow the directions on screen.
Note: It may be necessary to right-click the DinoCapture 2.0 software icon and ‘Run as administrator’
User Interface
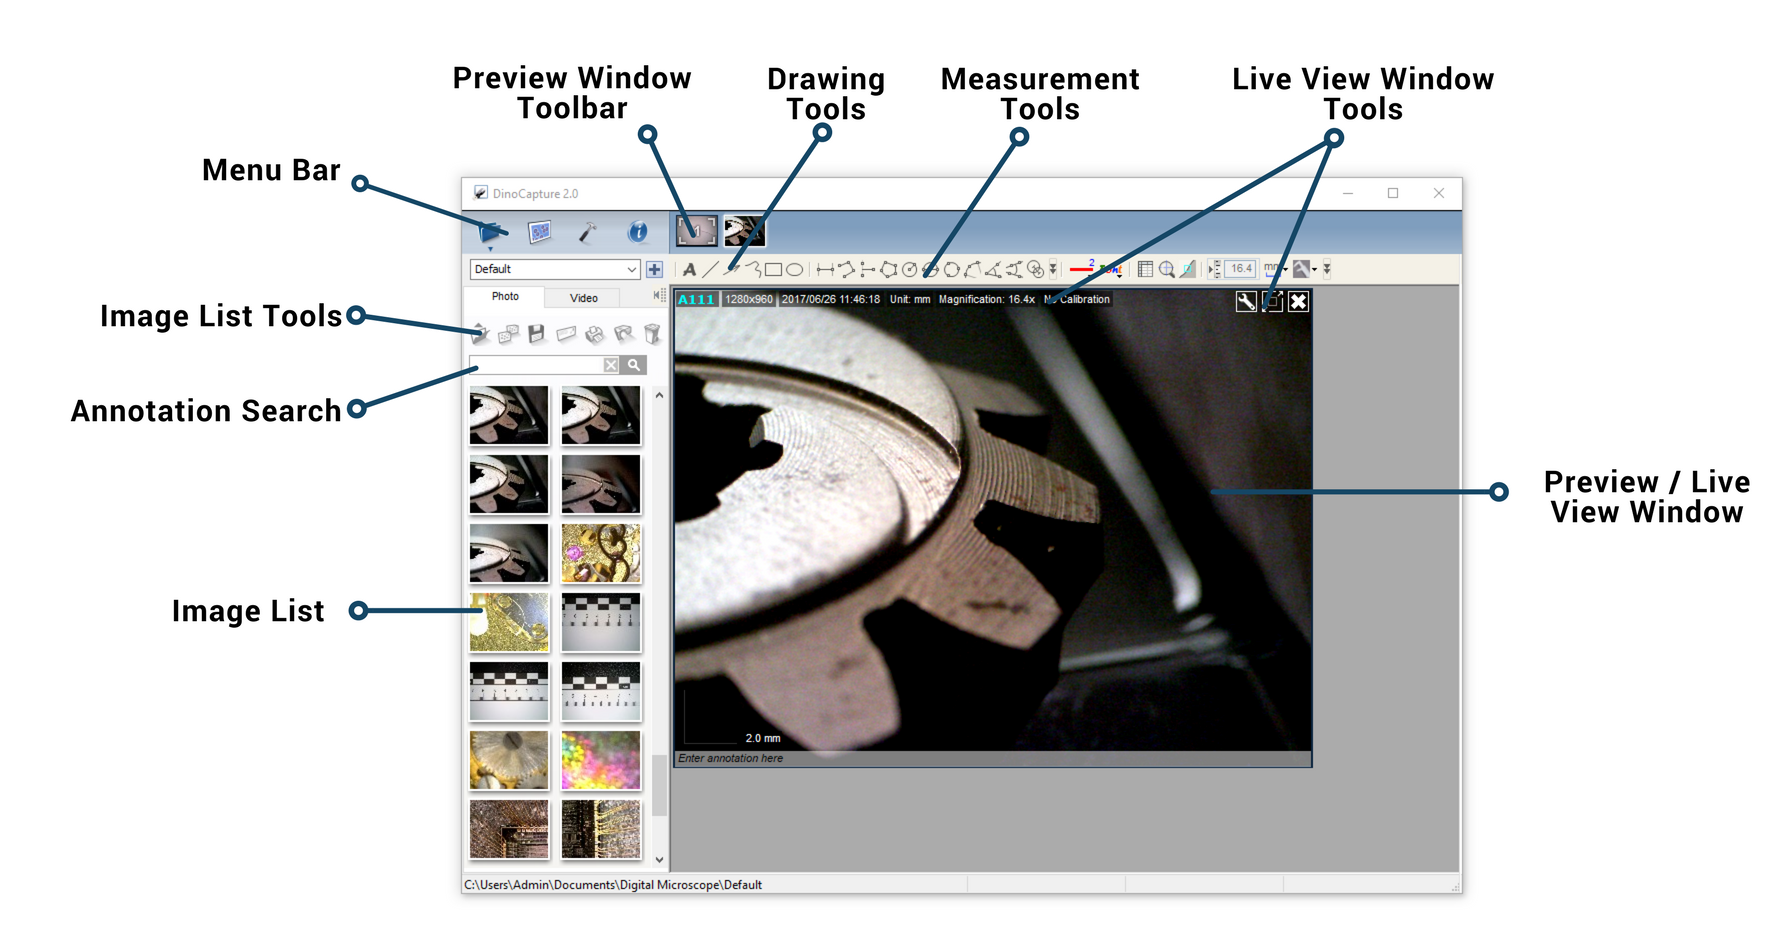
Menu Bar

The Menu Bar has 4 buttons for quick access of:
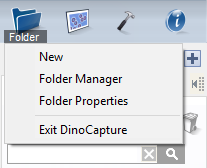
Folder
| Menu Option | Description |
|---|---|
| New | Displays the “New Folder” window that allows you to create a new folder to save pictures/videos. If no folders are created, the “New Folder” window will automatically pop up. See Also: How to create a new folder |
| Folder Manager | Displays the “Folder Manager” window, which allows you import, create, open, delete, as well as change the sorting order of folders. See Also: Folder Manager Window |
| Folder Properties | Displays the “Folder Property” window. Allows you to see the properties of the current save folder and also allows changing the name and edit notes about the current save folder. |
| Exit DinoCapture | Exit’s DinoCapture 2.0 software. |
| Folder drop-down box | Below the Folder menu, there is the folder drop-down box. With it, easily create a new folder by typing a name in the box and then press the “New Folder” button. Also, switch folders from the folder drop-down box. |
Files 
| Menu Option | Description |
|---|---|
| Open | Opens a selected picture or video to be viewed on the main view window. |
| Copy | Copies the selected picture or video to be pasted into another folder or program. |
| Copy to | Copy selected pictures to a different save folder. |
| Move to | Move selected pictures to a different save folder. |
| Save As | Opens the “Save as” window, which allows you to save your files into the desired folder and file format. |
| Delete | Allows you to delete selected pictures or videos. You will be prompted to confirm your decision. See also: Delete Key |
| Send Email | Allows you to send selected pictures through your default email account. |
| Slideshow | Starts a slideshow with the pictures in the Image List. See also: How to start a slideshow Show Image List |
| Displays the “Print” window, which allows you to print the selected picture. | |
| Close All Opened Files | Closes all open pictures or videos in the picture management bar. |
Settings 
Help 
| Menu Option | Description |
|---|---|
| User’s Guide | Opens the “User’s Guide” that will help you to understand functions and features of the DinoCapture 2.0 software. |
| About DinoCapture 2.0 | 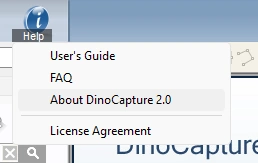 Opens the “About” page pop-up for DinoCapture 2.0 which shows the installed software version. To exit click on the pop-up and the window will disappear. 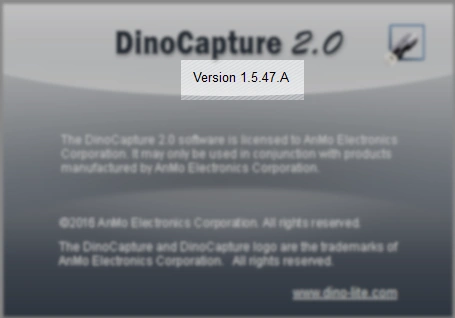 |
| License Agreement | Opens the license agreement PDF file |
Image List Tools
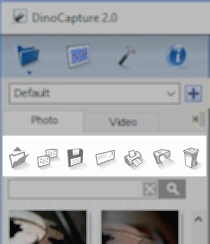
| Menu Option | Description |
|---|---|
| Open | The open icon allows you to open a highlighted picture in the image list. Once an image thumbnail is selected, press the Open button to open the picture to the main window. |
| Copy | The copy icon allows you to copy a selected file and paste the image into a different location such as Microsoft Word. |
| Save As | Opens the “Save As” window so you can save the file or files into the desired file format or folder. See Also: Ctrl+A Shift and Left Mouse Button Ctrl and Left Mouse Button |
| The Email icon allows you to email selected pictures without exiting the DinoCapture 2.0 software. Selecting the icon will open your default email client. | |
| The Print icon allows you to print the selected picture. This makes it easy for users to save a printed copy of the image selected. | |
| Slide Show | The Slide Show icon starts a slideshow of selected pictures in the Image List. See Also: How to start a slideshow Show Image List |
| Delete | The Delete icon allows you to delete certain pictures from the image library. This is very useful to clean up the image thumbnail list of any unwanted pictures. See Also: Delete consecutive pictures Delete multiple pictures Delete key |
Search Box
| Menu Option | Description |
|---|---|
| Search | The Search Box is to help find images in the image list with desired text that where written in the Annotation Block at the bottom of the preview windows. |
Toolbar

Preview Window Management Toolbar

| Multiple Dino-Lites | The DinoCapture 2.0 software can use multiple Dino-Lite Digital Handheld Microscopes simultaneously. Simply select which camera to turn on indicated by the number located in the preview window management bar. Opened pictures and video will also be displayed on this bar. |
| Closing a Window | On the preview window management bar located on the top of the main window, you can close an open picture by right clicking on the picture and select “Close window”. See Also: Ctrl and Left Mouse Button |
| Closing ALL Windows | On the preview window management bar located on the top of the main window, you can close an open picture by right clicking on the picture and select “Close window”. See Also: Ctrl and Left Mouse Button |
Drawing Tools
The drawing toolset allows you to write text and draw on the images. The bar is located below the preview window management bar.
| Label | Description |
|---|---|
| Text | The text tool lets you write text anywhere in the picture. Simply select the tool to create the text box and then the area within the text box is ready to write in. To start a new text line, press ENTER. When done, left click out of the text box to finish. Tip: You can edit the text by selecting the text icon and then clicking on the text you want to edit. See also: How to resize the text box |
| Line | The line tool allows you to draw lines on the picture. Simply click and drag to draw the desired line. |
| Arrow | The arrow tool allows you to draw arrows on the picture. Simply left click and drag your mouse to the place you want the arrow to point to. |
| Scribble | The scribble tool allows you to draw a line freely on the image. Simply left click the mouse once to start and click again to finish the drawing. |
| Rectangle | The rectangle tool allows you to draw rectangles on the image. Simple left click and drag out to create the size of the rectangle and click again to finish. |
| Oval | The oval tool allows drawing of ovals on the image. Simply left click to start the oval and click again to finish. |
Measurements Tools

| Line Measurement | The line measurement allows you to measure the linear distance between two points. Simply left click and drag to the desired length, and click again to finish. Tip: Hold the Ctrl key for a straight line |
| Continuous Line Measurement | The continuous line function allows measurement of the distance between multiple connecting lines. Simply click and drag to form one section of distance, click again to start another section. Continue until the total desired distance is measured. Double click to finish. |
| Point to Line Measurement | The polygon measurement feature allows measurement of a polygon. Simply click and drag to form the desired length, and click again to start the next section. When finished, double-click to finish the polygon measurement. |
| Radius of Circle Measurement | The radius of circle measurement allows you to measure the circumference, area, and radius of a circle. Simply click and extend out to the desired radius. |
| Diameter of Circle Measurement | The diameter of a circle measurement allows you to measure the circumference, area, and radius of a circle. Simply click and extend out to the desired diameter |
| Three-Point Circle Measurement | The three-point circle measurement allows the measurement of the circumference, area, and radius of a circle. Simply click on any three points on the circle you wish to measure. |
| Three-Point Arc Measurement | The three-point arc measurement allows a measurement of an arc. Click on three consecutive points on an arc to measure. |
| Three-Point Angle Measurement | The three-point angle measurement allows the measurement of an angle. Start at the pivot point and extend out to start measuring an angle. |
| Four Points Angle Measurement | The four-point angle measurement allows the measurement of an angle by selecting four points. Simply select two points from one line segment and another two points from another line segment to complete the angle measurement. |
| Center Distance | After drawing at least two circles, you can select this measurement tool to measure the distance between the centers of two circles. Simply select the icon and then select two circles that you want to measure the center distance of. The mouse pointer will change to a pointing finger for selectable circles. Click on each and the software will measure the distance |
| Gridlines | You can add gridlines to the live video or images. The pitch will match the magnification inputted. |
| Circle Grid | You can add circle grid to the live video or images. The pitch will match the magnification inputted. |
| Crosshair | You can add a crosshair to the live video or images. The crosshair XY position can be moved when you select it. The cursor position is the location of the mouse pointer and location 0,0 is the center coordinates of the crosshair. |
| Scale Crosshair | You can add a scale crosshair to the live video or images. The crosshair XY position can be moved when you select it. |
| Fixed Length | Fixed length is a measurement tool where you type the desired length and the length can be rotated and moved without changing the length of the measurement otherwise intentionally by double-clicking on the measurement results and typing in the new length. |
| Fixed Angle | Add a user-defined fixed angle measurement |
| Lasso | Lasso is a measurement tool for freehand tracing a selection outline around an image. As you trace, the length (mm) and area (mm2) of the selection outline will update. |
| Color Average | Color Average is a tool that measures average RGB color values within selected image regions. Color values are displayed in hex triplet format. Example: For the CLA0 image region (the area within the blue rectangle in the image below) the average RGB color value is 8A69BB. |
| Edge Tracing | Automatically place points along a line that is in contrast with the image |
Text & Line Edit ![]()
You can easily access line and text properties on the toolbar. The line and text can be customized to fit your needs.
| Line Color | Press the line format icon  and then select the color icon. The color list will expand for you to choose a line color. and then select the color icon. The color list will expand for you to choose a line color. |
| Line Style | Allows you to change the width of the lines you create. |
| Line Width | Allows you to change the width of the lines you create. |
| Font | Clicking on |
Measurement Tools
| Measurement Properties | Clicking on the icon allows you to show or hide the measurement properties window. Notice: The measurement and calibration feature is only available for certain models. See Also: About the measurement property window |
| Magnifier | Allows you to digitally enlarge the area around your mouse pointer for more details and accurate measurements. Hint: Use the arrow keys on your keyboard for pixel by pixel movement. |
| Snap Mode | Allows the measurement points to detect edges to assist with placement. |
Measurement Settings
| Input Magnification | Input the magnification in the blue box. The magnification can be read from the dial on the microscope. Once the image is in focus with the Dino-Lite, insert the magnification you see on the dial into the magnification box to start using the measurement tools. For Automatic Magnification Reading (AMR) models, this figure will be input automatically. See Also: How to measure |
| Units | The drop-down box allows you to select the unit of measure. Available Units: inch, mil, mm, um. |
| Calibration Menu | No Calibration: Use the default measurement settings. New Calibration Profile: Create a new calibration profile. Open Calibration Folder: Opens the folder where your calibration settings are located. From that window, you can select already created calibration profiles or delete them. See Also: How to calibrate measurements Notice: The calibration feature is only available for certain models. |
| Barcode Reader Toggle | Click on the icon to enable and disable barcode detection |
Live View Window Tools
How to:
Basic Functions
Record a video
- In the active live video window, click on the icon to start a video.
- A red record dot will start flashing when recording.
- Click the video record button again to stop recording.
- Select the “Video” tab to check the recorded video.
Record a time-lapse
- Press the time-lapsed button on the active preview window.
- In the “Setting” section, set the Duration of the recording and the Interval DinoCapture 2.0 will take pictures.
- Under “Information” select the radial dial to Video to create a time-lapsed video or select Photo for DinoCapture 2.0 to automatically take pictures with the set parameters from step 2.
- Press Start to start recording.
- Press Stop if you would like to stop the recording before the set duration.
Create a new folder
- Click the Folder icon in the top left corner of the main window.
- Select “New” to open the New Folder pop up window.
- In the “New Folder” window give the new file a name by filling in the text box next to “Folder name”.
- Press “Change” if you want to change the directory of the new folder.
- When finished, press “Select” and the new folder is ready to use.
Note: If no Directory is specified, DinoCapture 2.0 will automatically create a Digital Microscope folder in “Documents” or “My Documents” folder.
Enter Full Screen
- Press to preview in full screen.
- Press ESC or right-click to exit full screen.
Tip: You can double click the mouse to take a picture when in full screen mode.
Draw
- Click on the draw tool on the tool bar.
- For this example we will draw a line.
- Click the left mouse button to start the line.
- Click the left mouse button again to stop the line.
Add Text
- Select the Text tool to start adding text. The icon will be located on the top left of the toolbar.
- Create the window size for the text box.
- Once the box is drawn, you are ready to input text into the text box.
- Click outside of the text box to stop.
Hint: Press ENTER to start a new line.
See Also:
How to adjust measurements and drawings.
How to move the text box and measurement results to a different location
Start a slideshow
- Highlight the picture you want to see in a slideshow with CTRL + Left mouse button.
- After the desired pictures are selected, press the slideshow button.
- Left-click to see the next picture or press “ESC” on the keyboard to cancel.
Move the camera preview windows
- When the mouse pointer turns into the move icon, hold the left mouse button.
- While the left mouse button is pressed, drag the window to your desired location.
- Release the left mouse button to set the window in it’s new location.
Note: The camera preview windows stack on top of each other when opened. The amount of preview windows opened will be displayed on the Preview Window Management bar.
Clear Drawings, Text, Annotations, and Measurements
- RIght-click on an active window when the cursors is in move window mode.
- A menu will appear. Select Clear.
- Select the items you wish to clear:
- Text
- Annotation
- Drawing
- Measurements
- ALL
See Also:
Deleting a measurement
Clear all measurements and drawing
Delete Key
Tip: To delete one drawing or measurement. Simply select it and press “Delete” on the keyboard.
Resize a text box
- When no tools are selected, mouse over to the text that you want to resize. The mouse pointer will become the move object pointer.
- Left click and the pointer will become an open hand.
- Move the mouse to the blue square and the mouse will turn into direction arrows. Left click the mouse and the textbox will be resizable.
- Left click again to set the new location.
Create parallel and horizontal lines
Hold down the “Shift” key on the keyboard while drawing a line allows you to easily create vertical and horizontal lines by allowing the line to move only 90 degrees.
Export Images
- Check the boxes that you want to imprint into the exported picture.
- Select the image size you want.
- Select image DPI.
- Then click “Continue” to proceed to the save as window to set name and folder for the image, to email, or go to print menu. Select “Cancel” will stop the process.
Import and Export Drawings
You can import and export drawings between picture in the software.
- Draw on an image using the draw tools.
- Right click and select “Export Drawing”.
- Create a file name and press “Save”.
- Open a new image and select “Import Drawing”.
- Locate the drawing you want to import then press “Open”.
- Example file: sample_01.atd
- The drawing is now imported into the new image.
Enter Transparency Mode
Up to four pictures can be changed into transparency mode. To enter the mode, right click an open picture and select “Transparency Mode”. To exit, right click again and select “Exit”.
Use CTRL + UP / CTRL + DOWN or the mouse wheel to increase and decrease opacity when in transparency mode.
Add a camera label
- Right click on a camera preview window.
- Input the label for the camera and press “OK”.
- The label will be displayed next to the name of the Dino-Lite.
Notice: The camera label displays only on the USB port the label was created.
Adjust Measurements and Drawings
- With no tools selected, move the cursor to the measurement you want to adjust. The cursor becomes a pointing filer.
- When the mouse become a pointing finger over a line or result, click it once.
- Now move your mouse over an endpoint. It will be accentuated with a blue square at adjustable points. The cursor will change into a moving cursor to notify you that you can select and move the endpoint.
- Click on the endpoint and adjust to the desired location.
- Click again to set the new endpoint.
Notice: The measurement and calibration feature is only available for certain model.
Use the magnifier
Click on the magnifier to open a window with a digitally zoomed image. You can ove the mouse pointer pixel by pixel by using the arrow keys on the keyboard. Left click, or press “Enter” to set an endpoint if using a measurement or draw tool.
Delete consecutive pictures
To delete multiple pictures in a row, hold down the SHIFT key and highlight the pictures you want to delete. Press the trash button to delete. You will be prompted to confirm.
Delete multiple pictures
To delete certain picture at the same time hold down the CTRL key while select the pictures you wish to delete. Press the trash button to delete. You will be promped to confirm.
Hint: CTRL + A select all picture on the image list.
Customize Shortcuts
Note: The Customize shortcut feature is available on DinoCapture 2.0 software versions 1.5.17 or newer, click here to download the latest version.
Customize shortcuts allows users to assign key and key combinations to DinoCapture functions to help improve the efficiency of the user’s workflow.
How To: Customize Shortcuts (YouTube)
- Make sure you have the latest version of DinoCapture 2.0 (Version 1.5.17 or newer)
- Go to Settings and select “Customize Shortcut Keys”
- Find and select the Command you want to use with a shortcut
- Under “New shortcut key” select the desired shortcut key
- At least one box must be checked for any key A-Z,1-0. This does not apply to the F1-F12 keys.)
- Click Close
Copy shortcut keys from one computer to another
- Once your shortcut keys are set up as desired on the first computer, close DinoCapture to make sure these settings are saved.
- Navigate to C:\Users*USERNAME*\Documents\Digital Microscope\Setting
- Copy the file labeled “Shortcut.dat” and move it to the second computer.
- On the second computer, navigate to C:\Users*USERNAME*\Documents\Digital Microscope\Setting and place the “Shortcut.dat” file that you copied from the first computer in this folder. If prompted, choose to overwrite existing files.
Measurement
Perform a measurement
- Input magnification that is read from the microscope into the magnification box. Automatic Magnification Reading (AMR) models do this step automatically.
- Select a measurement tool.
- Select a unit of measure.
- In this example: we will measure distance.
- Lleft Click once to start the measuremnt.
- Left click once more to end the measurement.
Hint: For more accurate measurement, click on the magnifier icon. While using the magnify feature, use the arrow keys on your keyboard for pixel per pixel movement. When set to the desired location, click left mouse button or press “Enter” on the keyboard to set the desired endpoint.
See also: Using the magnifier
See also: How to calibrate measurements
Notice: The measurement feature is only available for certain models.
Delete a Measurement
- On the measurement properties window select the measurement you want to delete.
- Select Delete.
See Also:
Deleting consecutive pictures
Deleting multiple pictures
Delete Key
Notice: The measurement and calibration feature is only available for certain models.
Measure the center distance between circles
After drawing at least two circles, you can select center circle measurement tool to measure the distance between the centers of two circles.
Select the icon and then select two circles that you want to measure the center distance of.
The mouse pointer will change to a pointing finger for selectable circles. Click on each and the software will measure the distance between the centers of two circles.
Auto Distance Measuring
- Input the magnification, and create a detection path for the edge detection indicator squares to travel by holding down the Ctrl key while using the Line measurement tool
- When the detection path is created, the Edge Detection Criteria window will pop up. Set the edge detection criteria for the edge detection indicator squares to follow.
Optional: Set validation rules for pass/fail analysis
- Click on the detection path to select it, then right-click on the detection path and select “Validation Rule” on the menu.
- In the Measurement Data Validation window, set the data ranges and pictures** that indicate the data range. Three data ranges can be created while “1” is first priority.
Rename Measurements
You can rename a measurement by selecting a measurement. Then right click and click “Rename”.
Then a window will pop up allowing you to edit the name.
Move Measurement Text
- With no tools are selected, move the cursor to the text box. The cursor becomes a pointing finger
- When the pointer becomes a pointing finger, click on the item you want to move to select it.
- Move your mouse over a measurement result text. The mouse will become an open hand allowing for selection.
- Left click on the measurement result once to release it from its current location.
- Left click again to set it to its new location.
Calibration
Create a calibration profile
- In the live window select the Calibration drop-down menu (or click on the calibration button.)
- Select “New Calibration Profile”.
- A small window will pop up. Give the profile a name.
- Click “Continue Calibration” when done naming the profile.
- In the new menu. Press “F8” or “Freeze” button to freeze the calibration object.
- Enter the magnification that can be read from the Dino-Lite. (AMR models perform this step automatically. Press Enter when finished.
- A red bar with two blue dots will appear with pink guidance lines, you are now ready to calibrate.
- Click on one of the blue dots to start moving the blue dot to your desired location.
- Click again to stop.
- Click on the other blue dot to start setting the other endpoint.
- Click on the left mouse button again to stop.
- When the correct distance is measured, enter the known distance.
- Enter the unit of measurement by select the “Unit” drop-down box.
- Press “Finish” when done.
Hint: You can create multiple calibration profile for different Dino-Lite models.
Notice: The measurement and calibration feature are only available for certain models.
See also: How to measure
How to perform Auto-Calibration with the CS-40
Auto Calibration requires a Dino-Lite Edge Series microscope camera, CS-40 Auto Calibration slide, and DinoCapture 2.0 versions 1.5.25 or newer, click here to download the latest version.
Auto Calibration provides an easier way to calibrate a Dino-Lite Edge Series microscope for measurement. The DinoCapture 2.0 software identifies special QR codes on the CS-40 slide and performs the calibration automatically.
CS-40 Auto-Calibration Target, enlarged to show details.
CS-40 QR codes are divided into 3 rows:
- Row A: magnifications of 120x and above
- Row B: magnifications of 40x – 220x
- Row C: magnifications of 20x – 50x
Tip: For more accurate results, it is recommended to create and save a calibration profile for each magnification range that measurements will be performed at. Calibration profiles are stored in the Calibration drop-down menu and a check mark will appear next to the selected profile.
Automatic calibration with the CS-40 slide
Bring the CS-40 into focus with the Dino-Lite.
Tips:
- Make sure the microscope is perpendicular to the calibration target
- View two or more QR codes for the best results
- Misaligned or heavily tilted CS-40 slide while in view, may result in calibration failure
2. Click the Calibration tool menu item and select New Calibration Profile.
3. Press F8 or click on the Freeze button.
4. Input the Magnification as shown on the dial. Microscopes with AMR display the mangification automatically.
Press Enter.
5. The software will automatically perform the calibration measurement and provide the adjusted magnification.
6. Verify your calibration by performing a test measurement with a known standard or the 10mm scale on the CS-40 slide
Tips:
For best results, select a calibration profile close to the magnification you are using.
For example, if the microscope is at 75x magnification and there are calibration profiles setup for 50x, 80x and 200x, it is best to use the profile setup at the closest magnification, which in this case would be 80x
If you measure with a magnification out of the calibrated range of your profile, the results may not be accurate. For example, if you calibrate at around 50x but then measure at 200x magnification, the measurement results may be inaccurate.
If fixed magnification is required, simply calibrate at that magnification only for the most accurate results. For example, if you will be using a fixed magnification of 50x, setting up a single calibration profile at 50x will give you the most accurate results.
Calibration can be disabled by selecting No Calibration in the drop-down menu.
Use Special Features
How to use EDR (Extended Dynamic Range)
In the active live video window, click on EDR and do not move the target until it finished processing.
Information about EDR:
EDR is a capture tool for the Dino-Lite Edge models with the EDOF feature that when used, can improve visible information on subjects that vary greatly in brightness levels. It
works by capturing and stacking 2-3 images with different exposure and help equalize the hard contrasts for a more natural image with fewer extremes for a more clear and detailed image.
How to use EDOF (Extended Depth of Field)
EDOF (Extended depth of field) is an image capture tool for the Dino-Lite Edge models with the EDOF feature that improves images of uneven surfaces by taking a series of images
at different focal depths and then automatically (or manually) stacking them in a single composite image.
EDOF (Automatic)
- Place the mouse pointer over the EDOF button.
- Scroll the mouse wheel to the desired amount of focal depth. (The more bars are shown, the greater the focal depth).
- Click the mouse to start the EDOF process. Do not touch the Dino-Lite microscope or specimen during this process.
EDOF (Manual)
- Place the mouse pointer over the EDOF button.
- Scroll the mouse wheel until the focal depth bars are replaced by the word “MANUAL”.
- Click the mouse and the EDOF-manual mode window will open.
- Capture multiple (up to 11) images at different focal points. Change the focus using the Focus bar slider or the Increment button. Clicking the Increment button changes the focus by the number of points shown in the Increment box.
- Click on the Start processing button to start the EDOF process. Do not touch the Dino-Lite microscope or specimen during this process.
Viewing an EDOF image
View the image with extended depth or by holding the Ctrl key on the keyboard, the EDOF image will show the original best-focused image at the mouse cursor’s position before stacking, and the mouse wheel can also be used for finding the upper or lower image layer. This feature would allow the user to recover the 3D feeling which
is lost by the stacked image.
The image taken by EDOF should be found in the image list noted “EDOF” in the header. Like a normal picture, the EDOF image can have annotation and drawing, but not measurements (because the magnification is varied with focus)
How to use Manual and Automatic Refocus
The Manual and Automatic Refocus for the Dino-Lite Edge models with the EDOF feature is for brief observations or captures on points of interest near the proximity of the initially
focused depth. Below describes how they are used:
Automatic Refocus
Hold the Ctrl key, then click on an area of interest in the live preview and the camera will attempt to focus at the selected depth. Releasing the Ctrl key to reverts back to the originally focused depth.
Manual Refocus
Hold the Ctrl key, and then scroll the mouse wheel when in the live preview window
to focus at depths above or below the initial focus. Releasing the Ctrl key reverts
back to the originally focused depth.
Update:
A new way of using EDOF refocus mode is now provided by pressing the scroll wheel during either live video or EDOF image preview as an alternative to CTRL+left clicks. To leave the refocus mode, simply left-clicking the mouse.
– The activation of EDOF refocus mode can be identified by the appearance of a cursor or the text of “Refocus Mode” at the lower-right corner.
– Under EDOF refocus mode, the “Focus Shift” information is shown on EDOF image which displays the focal difference between the refocused and original focus positions. The Focus Shift may vary with the entered magnification rate and it is provided as a reference for the depth information.
IP Camera Mode
You can allow remote viewing of Dino-Lite or Dino-Eye cameras by switching your live preview window into IP camera mode with the DinoCapture 2.0 software. IP camera allows the live viewing of the video feed in a local area network* or through the internet*. The only way to connect to a remote Dino-Lite or Dino-Eye is to know the IP
address. It can be used for professions such as doctors who require doctor/ patient confidentiality, education where the teacher can see what the students are examining right away, and more.
Switch to IP Camera Mode for others to see your Dino-Lite or Dino-Eye. Turning your live preview window into IP camera mode allows remote DinoCapture 2.0 users to be able to view the live video feed of your Dino-Lite or Dino-Eye.
Switching to IP Camera Mode
1. Right-click the live preview window
2. Select “IP Camera Mode”
3. The live preview window will now change into IP camera mode and is now ready for remote DinoCapture 2.0 users to view the live video feed from this Dino-Lite
or Dino-Eye. In this mode you can take pictures, add a password for additional security, and turn on/off the LED’s on the Dino-lite. You can also see the LAN and WAN** IP address on the top left corner of the window to easily identify your IP address for remote users (others) to connect to your Dino-Lite or Dino-Eye that has its live preview window in IP camera mode.
If you are behind a firewall, please check the “If behind a Firewall” section of this instruction sheet.
4. When asking someone to connect to your Dino-Lite or Dino-Eye with its live preview window in IP camera mode through the internet*, have them type the WAN** IP address instead of the LAN** address when attempting to connect. When connecting through the intranet*, use the LAN IP address when connecting to other Dino-Lite or Dino-Eye that has its live preview window in IP camera mode.
Connect to remote Dino-Lite or Dino-Eye
- Ensure the remote Dino-LIte or Dino-Eye you want to connect to have switched it’s live preview window to IP camera mode.
- Select “Settings”.
- Move your mouse over to “Connect to IP DIno-Lite or Dino-Eye”
- Then click “New”
- The New Connection window will pop up where you can fill in the information to connect to the remote Dino-LIte or Dino-Eye.
Alias: Create a name for the remote Dino-Lite or Dino-Eye (When done, the name will be displayed in “Recent”).
IP: Enter the IP of the remote Dino-Lite or Dino-Eye that has its live preview window is in IP Camera mode.
Port: Port refer to the TCP Port****. The default is 42521 but you can create your own number (1024 – 65535). If you do not know which TCP Port is used already, you may want to use the default number.
Camera No: The assigned number of the Dino-Lite or Dino-Eye that has its live preview window in IP Camera mode (server). If only 1 Dino-Lite is connected normally “1” is the camera number.
Password: Enter password if a password was created.
Note: The Dino-Lite or Dino-Eye whose live preview window is in IP camera mode cannot be detected by another DinoCapture 2.0 over the internet* if the router has a firewall. Set the router firewall to do Port Forwarding. When behind a firewall, port forwarding will allow people to connect to your Dino-Lite or Dino-Eye whose live preview window is in IP camera mode.
Geotagging Photos
You can add GPS coordinates on pictures taken or edit coordinates on pictures that already have GPS location.
Click on an open image and select “Geotagging photo”, after that the “Location Editor” will pop up for you to enter GPS coordinates. When done, you can see the location by pressing the “show location” icon on bottom right side of the image.
See Also: External GPS
Change DinoCapture 2.0 default folder location
1. Create a shortcut for DinoCapture.exe

2. Right click on the shortcut and select “Properties”
3. Locate the “Target:” section.
4. Move the input text blinker to the very end of the target location (after the ”).
For example at the end of: “C:\Program Files (x86)\DinoCapture 2.0\DinoCapture.exe”.
5. At the end of the target location, add the following text: -f (Make sure there is only ONE space before and after the -f).
It should look something like this: “C:\Program Files (x86)\DinoCapture 2.0\DinoCapture.exe” –f
6. After the –f, input the location of the desired folder in quotations.
For example: “C:\DinoLite”(Make sure there is only ONE space before and after the -f).
When completed, the link should look something like this: “C:\Program Files(x86)\DinoCapture 2.0\DinoCapture.exe” –f “C:\DinoLite”

7. You are now ready to use DinoCapture 2.0
Keyboard Controls
Keyboard controls provide more ease and practicality with the DinoCapture 2.0 experience.
The keyboard controls can also be customized with the Customize Shortcuts feature.
See also: How to customize shortcuts
Delete key
You can delete pictures on the image list simply by pressing the “Delete” key. You can also delete selected or active annotations and measurements with the “Delete” key.
F6 Key
Holding down the F6 key on the keyboard allows to continuously taking pictures until the button is decompressed.
F7 Key
Pressing the F7 on the keyboard opens the time-lapsed window.
F8 Key
Pressing F8 freezes the live video feed of all Dino-Lite.
F9 Key
Pressing F9 simultaneously takes a snapshot with all live Dino-Lite.
F10 Key
Pressing the F10 on the keyboard to enters full screen mode. Press F10 again to exit.
F11 Key
Pressing the F11 on the keyboard takes a snapshot of the specimen in the active video window.
F12 Key
Pressing the F12 key on the keyboard lets you start recording a video. Pressing the F12 key again stops the recording.
Ctrl+A
Pressing Ctrl+A selects all files on the image list.
Ctrl+W
Next window on preview window management bar becomes active window.
Ctrl+Z
Undo last drawing or measurement.
Ctrl+F4
Close a preview window.
Ctrl+Tab
Next window on preview window management bar becomes active window.
Alt+F4
Exits DinoCapture 2.0. Note: This is a Windows function that will work on most programs and can even shut down the computer.
Esc
Abort using tools.
Shift and Left Mouse Button
Holding the Shift key and clicking on the first and last images desired; highlights the group of images.
See Also:
Deleting consecutive pictures
Ctrl and Left Mouse Button
Highlight desired pictures by holding the Ctrl key and select desired pictures or video by pressing the left mouse button.
See Also:
Deleting multiple pictures
Arrow keys
With the magnifier active, use the arrow keys to move the cursor pixel by pixel for precision movement.
See Also:
Magnifier
Mouse Controls
Opening a picture
To open a picture, you can simply double-click its thumbnail.
Moving a window
When you hold down the left mouse button on a child window, you can drag the window anywhere within the main window.
Stopping continuous line and polygon measurements
DOUBLE left clicking stops the continuous line and polygon measurements.
Starting a live video feed
Double-clicking the camera icon on the preview window management bar starts a live video feed. For example if one Dino-Lite is plugged in, double-click the thumbnail and the live video will start.
See also:
Preview Window Management Bar
Taking a picture
You can also double left click to take a picture in the live video window other than the picture button.
Digital 2x Zoom
Scroll the mouse wheel to digitally zoom-in/out when the pointer is in a live preview or image with resolution higher than 1280 x 960.
Measurement Properties
About the measurement property window
The measurement property window organizes and shows the status of all the measurements as well the ability to adjust how the results are shown in the image.
Notice: The measurement and calibration feature is only available for certain models.
Tabs
The DinoCapture 2.0 software separates each type of measurements into tabs helping you to organize your measurements.
Line
The Line tab shows all the properties of the line measurements as well as the ability to select what information is shown on the image, ability to delete, change units of measurement, and also export data to excel.
Polygon
The Polygon tab shows all the properties of the polygon measurements. As well as the ability to select what information is shown in the image, ability to delete, change units of measurement, and also export data to excel.
Circle
The Circle tab shows all the properties of the circle measurements. As well as the ability to select what information is shown in the image, ability to delete, change units of measurement, and also export data to excel.
Arc
The Arc tab shows all the properties of the arc measurements. As well as the ability to select what information is shown in the image, ability to delete, change units of measurement, and also export data to excel.
Angle
The Angle tab shows all the properties of the angle measurements. As well as the ability to select what information is shown in the image, ability to delete, change units of measurement, and also export data to excel.
Categories
Show
-The show checkbox let you see the measurement results for the selected measurement on the image. Deselecting the checkbox hides the selected measurement results.
Name
-Displays the name of the measurement.
Length
-Displays the length of the measurement (L).
Area
– Displays the area of the measurement (A).
Radius
-Displays the radius of the measurement (r).
Angle (deg)
-Displays the angle of the measurement (∠).
Unit
-Displays the unit of measure in the picture
Display
The display checkboxes control what you would be able to see on the picture. Only the values that are relevant to the type of measurement are available for selection, the others are grayed out. Un-checking and checking the boxes controls all measurements of the same type.
Name
-Display the name of the measurement.
Length
– Display the length of a measurement.
Area
-Display the area of a measurement.
Radius
-Display the radius/diameter of a measurement.
Angle
-Display the angle of a measurement.
Unit
-Display the unit of measure next to the results
Opacity (alpha)
– Available when using High Quality drawing mode, this controls the amount of opacity for the displayed measurements and drawings. The higher the number, the less transparent it is.
Background Opacity (alpha)
– Added adjustable opacity to the measurement text box under High Quality drawing mode. It can be adjusted by changing the Background Opacity (alpha) value in the Measurement Properties window.
Buttons
Decimals
Select the decimal places to be shown on measurements.
1= 1 decimal places= 0.1
2 = 2 decimal places = 0.01
3 = 3 decimal places = 0.001
4 = 4 decimal places = 0.0001
Delete
Select a measurement and click on “Delete” to remove the measurement.
Clear all measurements and drawing
Clear all measurements and drawings on the active window.
Export to excel
Exports data from the active window to Excel.
Close
The “X” on the top right corner closes the measurement properties window. Go to settings and select “Measurement Properties” to reopen the window.
Camera Adjustment
Press the button on the video preview window to open the camera adjustment window. The camera adjustment window controls the live video settings. The buttons on the bottom of the camera adjustment window allow you to Import or Export video settings or restore Default settings. There is also an option to Load the current setting on startup. Once you have made your selections, click the OK button to confirm and close this window.
Camera Adjustment Window
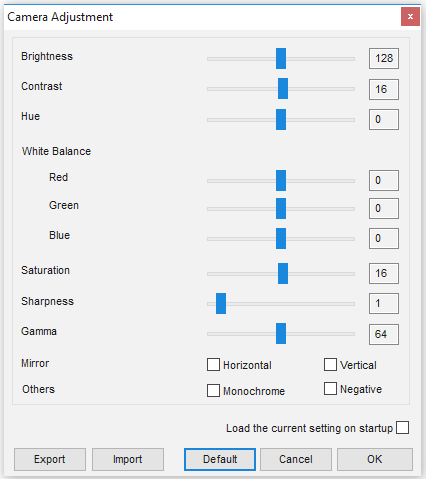
Note: The camera adjustment window settings vary depending on the model. This camera adjustment setting applies usually for only the Edge Series Dino-Lite models
For example, Dino-Lite Premier Series can export or import your settings so you can save the setting for another time by exporting the setting or importing a setting from a previous time.
Camera Color Adjustment Settings
Monochrome Setting
This setting applies a grayscale effect, as shown in the pictures below.
Monochrome setting disabled Monochrome setting enabled
Negative Setting
This setting applies a color negative effect, as shown in the pictures below.
Negative setting disabled Negative setting enabled
Microtouch Controls
The MicroTouch (touch sensitive static sensor) feature on the handheld digital microscope gives users the option of taking a picture right from the microscope itself. The MicroTouch tool is activated by touching the MicroTouch trigger after starting the DinoCapture 2.0 software. Once recognized in the software, activate or deactivate the MicroTouch controls with this button.
The MicroTouch was designed to minimize image blur while taking a picture with the microscope. Great for those moments when you need to take a picture but have a hard time reaching the computer
Notice: Not all models have the MicroTouch feature.
Picture Adjust
The picture adjust window allows you to change the picture colors and qualities. To open the picture adjust window, press the setting button when the active window is a picture. This version of the picture settings usually applies to Dino-Lite Premier, Pro, and Basic series.
Picture Adjust
Adjust the color properties of the selected picture.
Contrast
You can adjust the contrast of the picture.
Brightness
You can adjust the brightness of the picture.
Saturation
You can adjust the saturation of the picture.
Hue
You can adjust the hue of the picture.
Gamma
You can adjust the gamma of the picture.
Sharpness
Allows you to adjust the sharpness of the selected picture.
Range
You can change the range of the sharpness.
Strength
You can adjust the strength of the pixel.
Picture Adjust Buttons
Default
Resets the picture settings back to default.
Save
Saves the adjusted picture settings and closes the picture adjust window.
Cancel
Closes the picture adjust window without saving changes.
Folder Manager
You can create, import previous, or delete save folders in the Folder Manager window.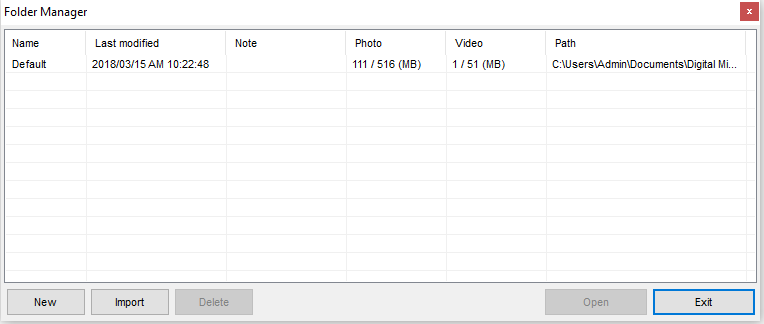
See also:
How to create a new folder
New
Allows creation of a new save folder for DinoCapture 2.0.
Import
Allows to add a previously created folder into the folder list; simply select the folder you created for the DinoCapture 2.0 that contains the pictures and video’s, and press OK.
Delete
Deletes a selected save folder from the Folder Manager window.
Open
Opens a previously made save folder created by DinoCapture 2.0.
Exit
Exit the Folder Manager window.


