Note: This article applies to Dino-Lite models with the EDOF (Extended Depth of Field) feature including the Dino-Lite Edge 4815 and 7915 series. EDOF also requires Windows 7, 8, or 10 and DinoCapture 2.0 version 1.4.7 or higher. Mac OS users may find access to DinoCapture by using Windows through virtualization software such as Bootcamp or Parallels, click here for more information.
EDOF is an image processing feature designed to automatically capture and combine multiple images at different focus levels to produce a final image with greater depth of field (focus stacking).
How to use EDOF
- EDOF Demonstration (YouTube video)
- One-touch Autofocus (YouTube video)
- EDOF Refocus Mode (YouTube video)
- EDOF Depth Reference (YouTube video)
- Advanced Manual EDOF Guide [up to 30 image layers] (PDF)
EDOF Manual Mode
- Select the size of the increments. Most customers leave this as “1” but some users find increasing it may save time capturing manual EDOF images of similar specimens.
- Choose a direction. If you want to stack upward, start at the bottom and if you want to stack downward start at the top.
- When you have a layer in focus that you want to be included in the EDOF image click “Capture”.
Note: Once a the Manual EDOF starts going in one direction (up or down) the process can only continue in the same direction. - Once you have at least two images captured you will have the option to “start processing”. Use this button once you are done capturing layers for your EDOF image.
EDOF Refocus Mode
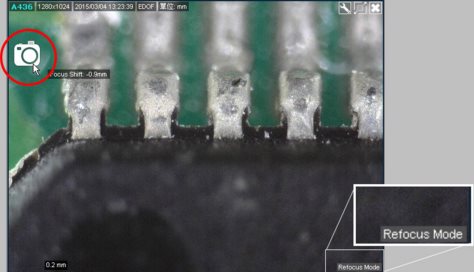
EDOF Refocus Mode can be used for brief observations or captures on points of interest near the proximity of the initial focused depth. Under EDOF Refocus Mode, the “Focus Shift” information on the EDOF image displays the focal difference between the refocused and original focus positions. The Focus Shift may vary depending on the entered magnification rate and it is provided as reference for depth information purposes. Note: Focus Shift depth information will not appear if a magnification rate is not entered prior to capturing the EDOF image. To access Refocus Mode, open a captured EDOF image which can be found in the image list noted “EDOF” in the header. Like a normal picture, the EDOF image can have annotations and drawings. However, EDOF images cannot have measurements because the magnification is varied with each focus point.

With the EDOF image open, press and hold the Ctrl key on the keyboard to view the original best focused image at the mouse cursor’s position before stacking. The mouse wheel can also be used for finding the upper or lower image layer. Note: An alternative to using CTRL+left clicks to access EDOF Refocus Mode is pressing the scroll wheel during either live video or EDOF image preview. The activation of EDOF Refocus Mode can be identified by the appearance of cursor ![]() or the “Refocus Mode” text in the lower right-hand corner of the window display. To exit Refocus Mode, simply left-click on the live video or EDOF image preview. Individual source images from a captured EDOF image can be retrieved and saved by using the Snapshot in Refocus Mode of a captured EDOF image.
or the “Refocus Mode” text in the lower right-hand corner of the window display. To exit Refocus Mode, simply left-click on the live video or EDOF image preview. Individual source images from a captured EDOF image can be retrieved and saved by using the Snapshot in Refocus Mode of a captured EDOF image.
Focus Stacking Direction
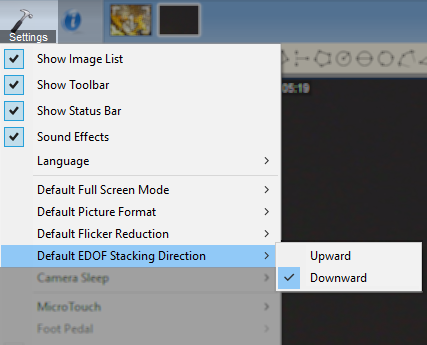
Change the direction that EDOF will stack images from the settings menu. By default, the capture direction is set ‘Downward’ (top to bottom) but it can be changed to ‘Upward’ (bottom to top). (Option available in DinoCapture 2.0 version 1.5.26 or newer)
Extracting individual frames from an EDOF image
The captured images from a finished EDOF image can be retrieved within the DinoCapture software
To extract individual JPG file frames:
1. Check to make sure you are using the latest version of DinoCapture 2.0 (1.5.14.N or newer)
2. Select the EDOF image you would like to retrieve individual frames from, by clicking on the image
3. Right-click and select Save (or click on the Save Icon in the toolbar)
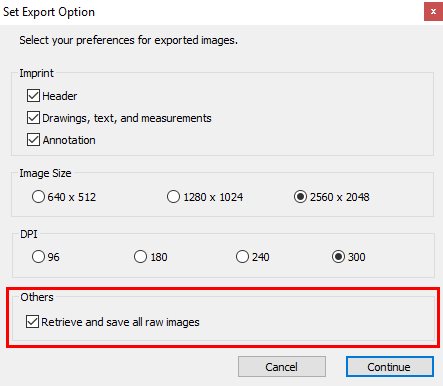
4. Check the box for “Retrieve and save all raw images” and click Continue
5. Choose a File name, File save location, and click Save
6. The individual images can be found in the selected File save location