Problem
Unable to install an older Dino-Lite Classic, Dino-Lite Plus or Dino-Lite Pro (model 211, 311(S)(H), 313) on a computer running Windows 8, 10, 11 or above.
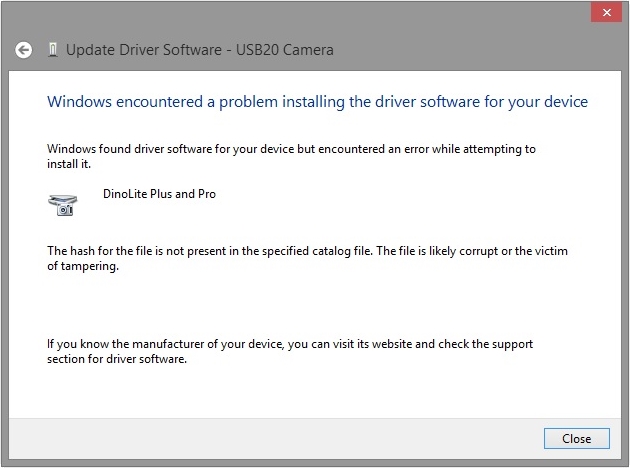
Windows found driver software for your device but encountered an error while attempting to install it.
DinoLite Plus and Pro
The hash for the file is not present in the specified catalog file. The file is likely corrupt or the victim of tampering.
If you know the manufacturer of your device, you can visit its website and check the support section for driver software.
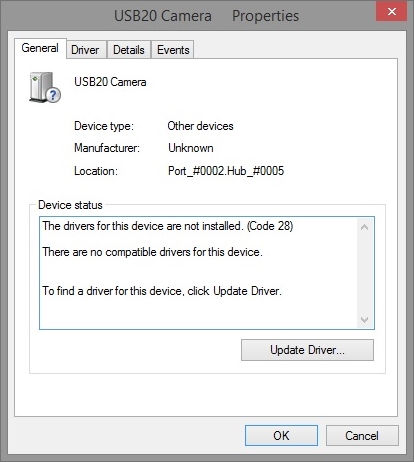
There are no compatible drivers for this device.
To find a driver for this device, click Update Driver.
Solution
By default Windows 8, 10, and 11 require that all device drivers have a digital signature. Some Dino-Lite models such as AM211, AM311(S)(H), AM313, AM411, and AM413 are older than Windows 8 and do not have a digital signature. To install these models on Windows 8 or above, the requirement for drivers to have a digital signature must be temporarily disabled.
Note: The solution to this issue involves restarting the computer. Before beginning, we suggest to save and close any other work on the computer. You may also wish to open these instructions on a different device or print them out.
| Instruction | Screenshot |
|---|---|
1. Windows 8: Hold (Windows key) + I to open the settings panel, then click Change PC settings.Windows 10: Hold (Windows key) + I to open the settings window, then select Update & security | 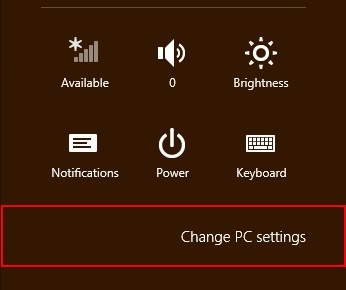 Windows 8 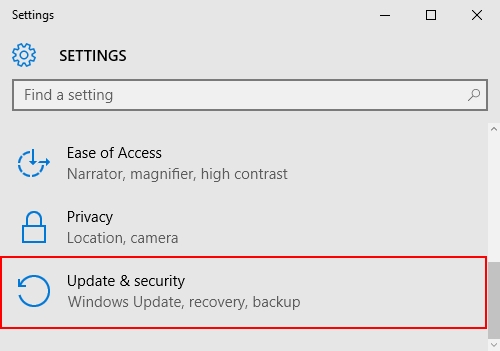 Windows 10 |
| 2. Windows 8: Select the Update and recovery menu item. Windows 10: Select Recovery | 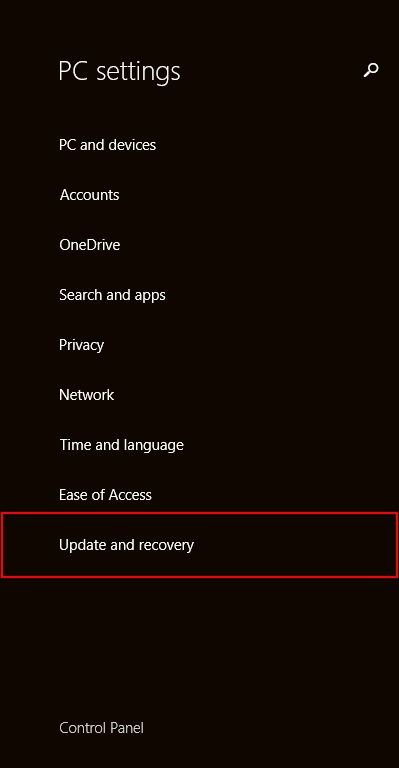 Windows 8 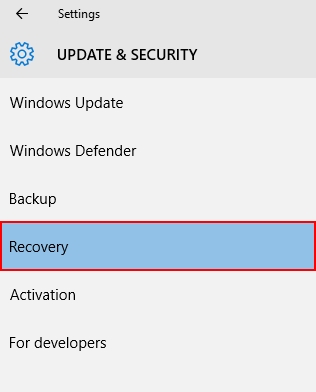 Windows 10 |
| 3. Windows 8 only: Select Recovery | 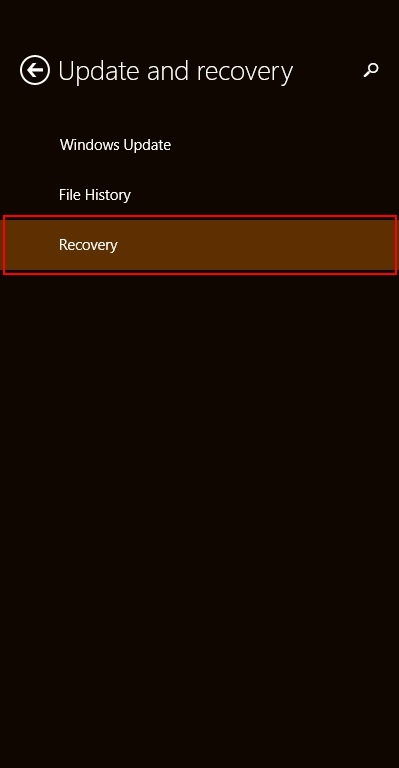 |
4. Under Advanced start-up select Restart now | 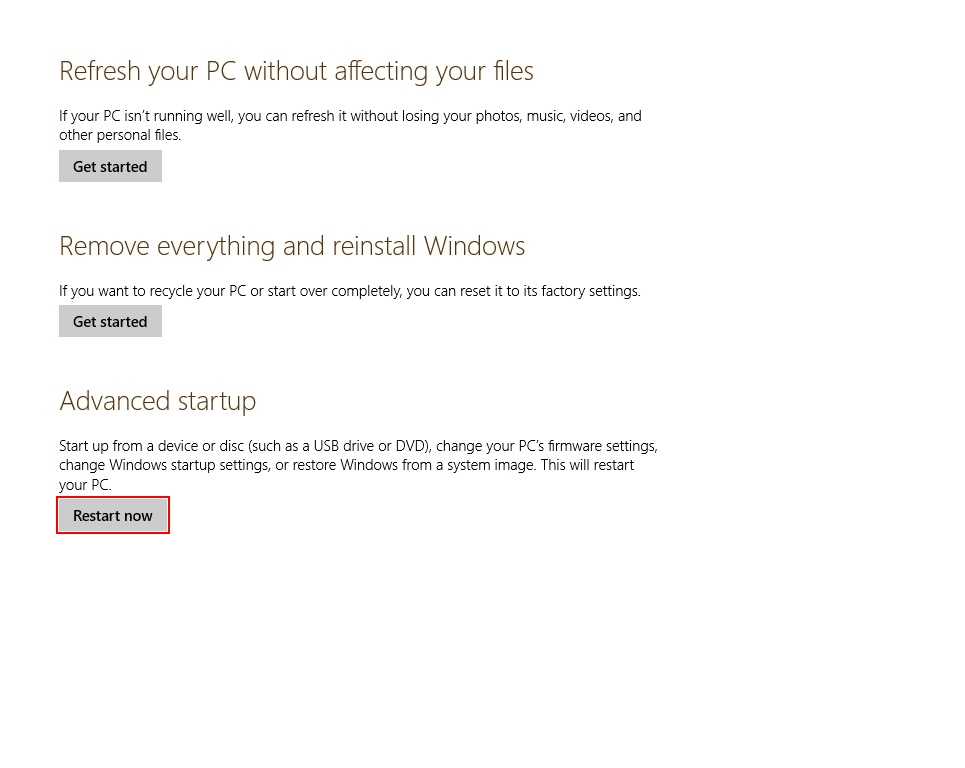 |
| 5. The computer will reboot to a blue menu screen. Select Troubleshoot | 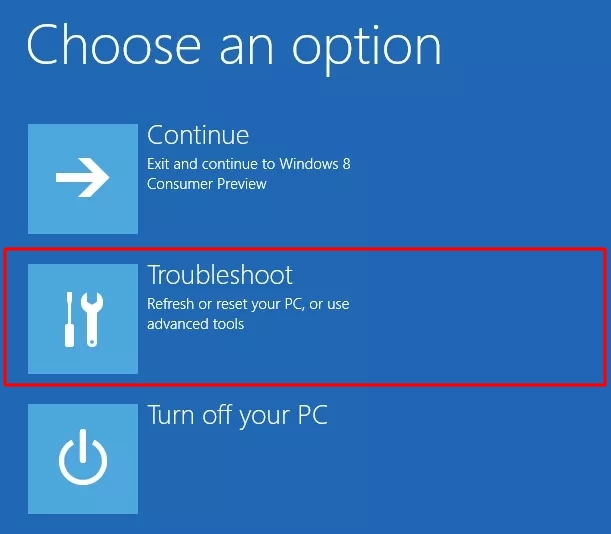 |
| 6. Select Advanced options | 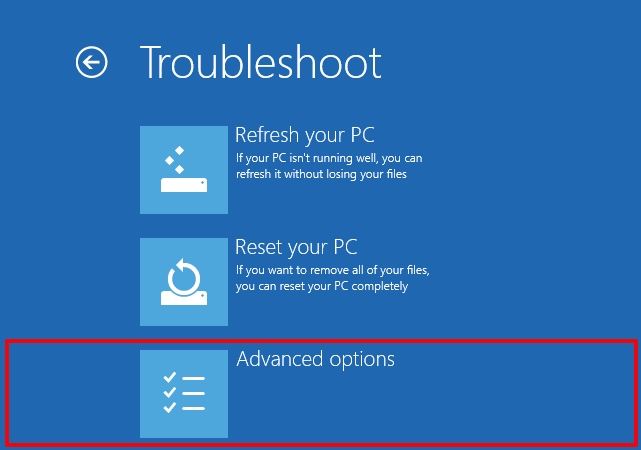 |
7. On the advanced options menu, select Startup SettingsNote: Some users may see a notice requesting a bitlocker recovery key, you must find your key and enter it to proceed. If provided by Microsoft it will likely be located on: https://onedrive.live.com/recoverykey | 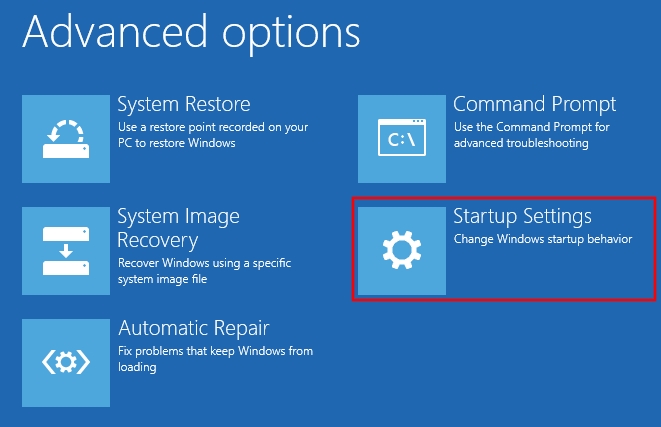 |
8. Before advancing further, please be aware that the next step (step 9) has a short time limit to select an option, otherwise Windows will boot up normally without the necessary change. Take a look at the directions for step 9 before advancing to be sure you can select the necessary option within the time limit. To advance to the next step, select Restart. | 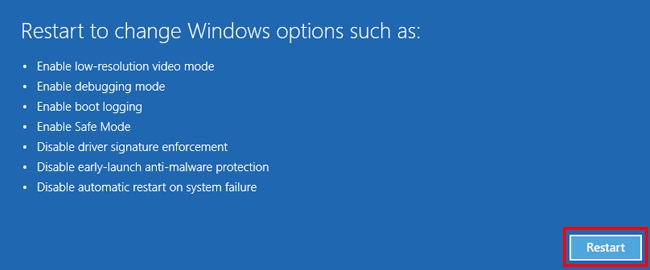 |
9. On the Startup Settings menu, press the 7 or F7 key on your keyboard to select the option 7) Disable driver signature enforcement | 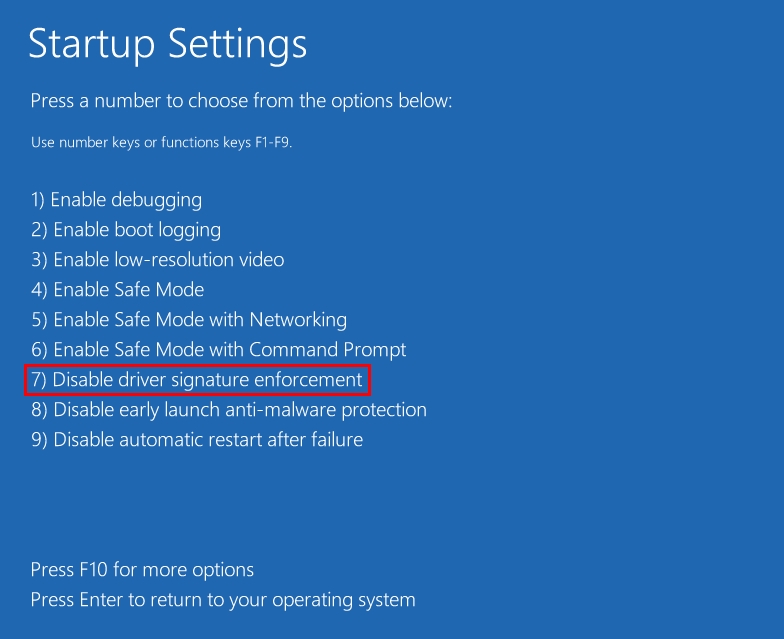 |
10. After selecting the option 7) Disable driver signature enforcement, Windows will boot back up and driver signature enforcement will be temporarily disabled. If you did not select that option in the previous step, start again from step 1 or the following steps will not succeed. | |
| 11. Disconnect the Dino-Lite if it is currently connected. Browse to https://www.dinolite.us/downloads and download the driver matching your Dino-Lite model. After the download is complete, install the driver. | |
12. If you see a warning message asking Do you want to completely remove the selected application and all of its features?, this indicates that you already tried to install the driver before driver signature enforcement was disabled. In this case, select Yes to remove the driver and wait for the process to finish, then open the driver installer once more to reinstall the driver now that driver signature enforcement has been disabled. After the driver has been reinstalled, reconnect the Dino-Lite to USB. | 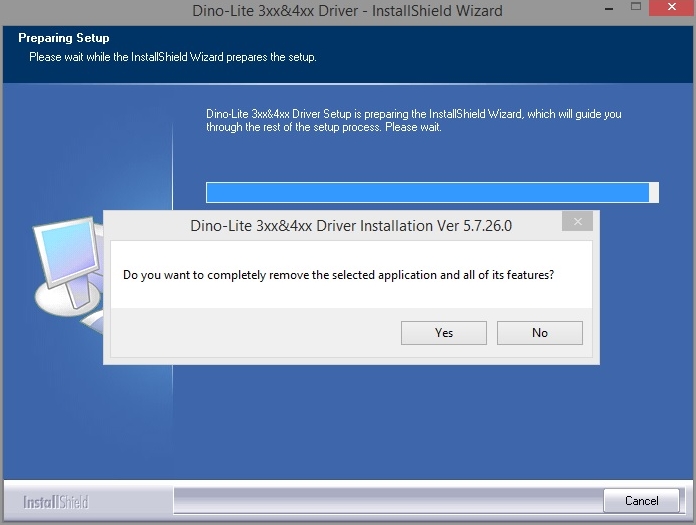 |
| 13. While installing the driver, or when plugging the device in after installing the driver, you will see a warning message stating Windows can't verify the publisher of this driver software. Select Install this driver software anyway | 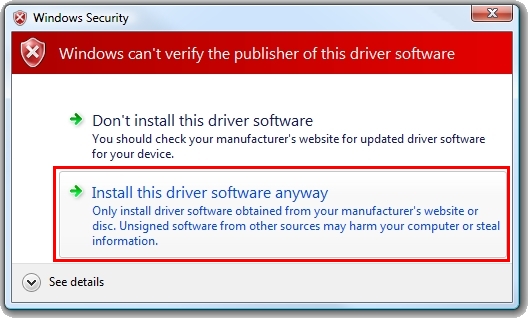 |
14. Press (Windows key) + X to open the Quick Access Menu, and select Device Manager from the menu. | 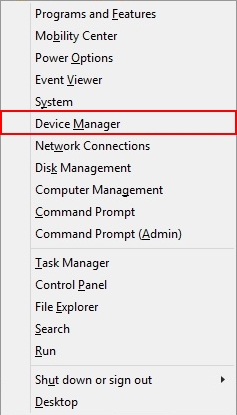 |
| 15. If the Dino-Lite appears in the device manager under Imaging Devices and there is no error sign, the process is complete and you can now use the Dino-Lite. | 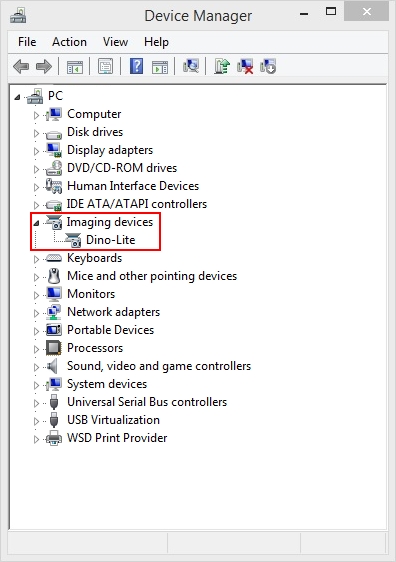 |
16. If Dino-Lite appears in the device manager under Other Devices and/or it appears with an error sign or the wrong name (e.g. ‘USB20 Camera’ instead of ‘Dino-Lite’), continue with the following steps. | 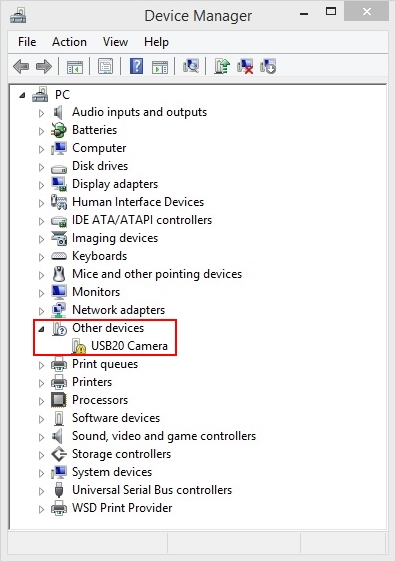 |
| 17. Right-click on the Dino-Lite device entry in device manager and select Update Driver Software.. | 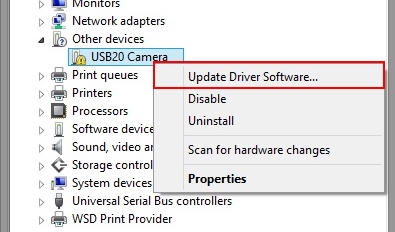 |
18. Select Browse my computer for driver software | 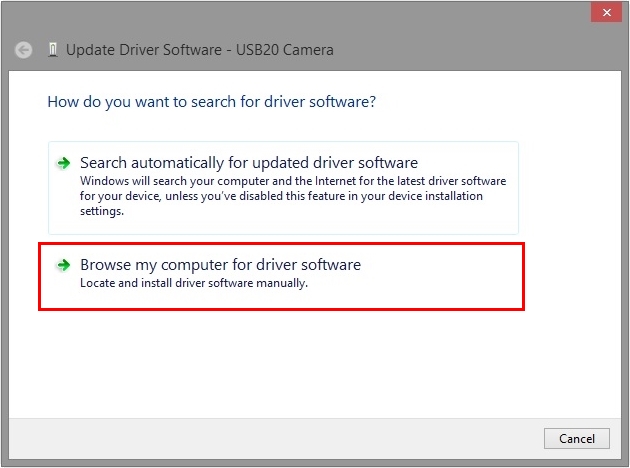 |
19. Select Browse.. | 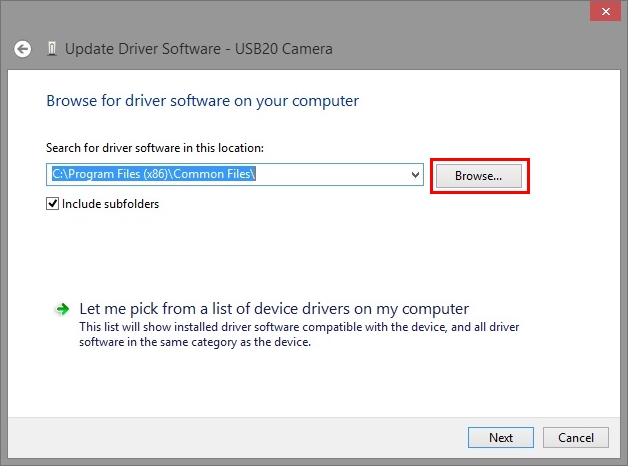 |
| 20. Browse to the correct location of the driver files. For Dino-Lite AM311(S)(H), AM313, AM411, or AM413 models, select C:\Program Files (x86)\Common Files\snp2std For Dino-Lite AM211, select C:\Program Files (x86)\Common Files\snpstd3 | |
21. After selecting the correct location, click OK and then click Next | 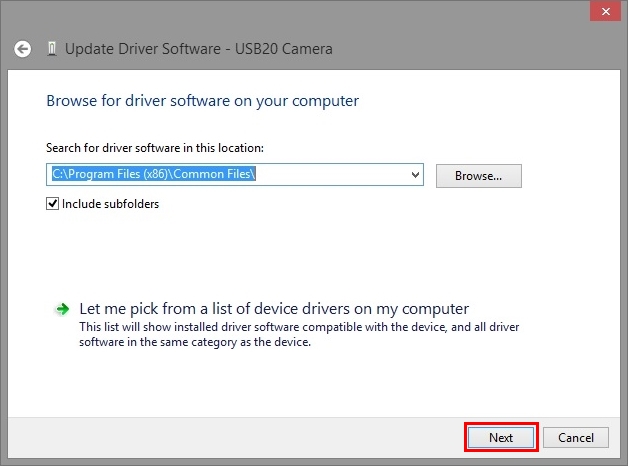 |
| 22. The driver will now install and you should be able to use the Dino-Lite successfully. If you still receive an error message or are unable to use the Dino-Lite, Contact us for support. |  |


